
.png&blockId=f70959ad-2ec5-4a28-9f59-7d00041d15a9&width=3600)

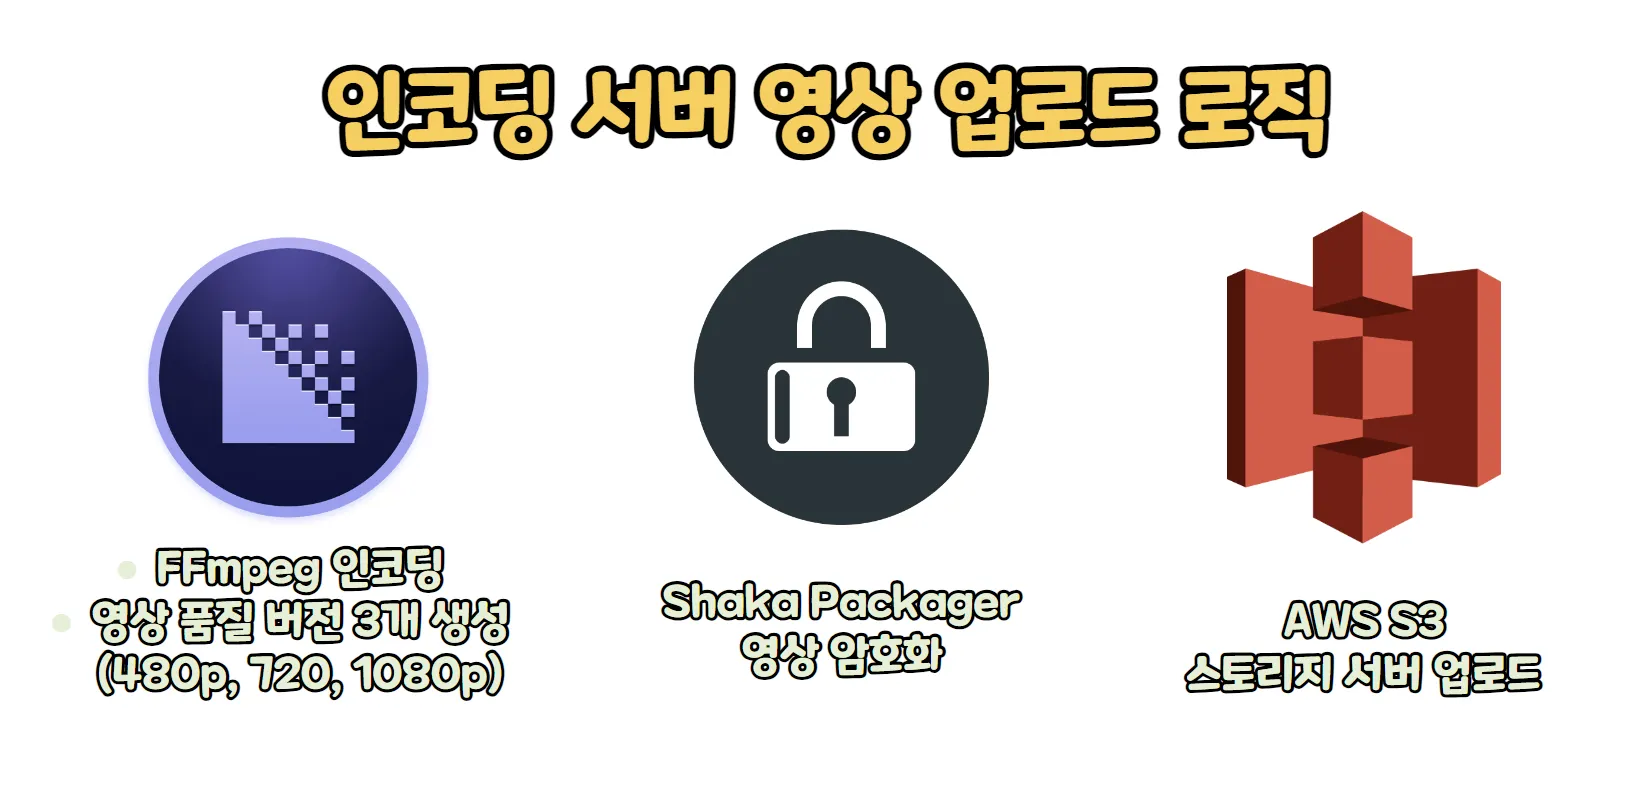
 인코딩 서버 로직
영상 요청 단계
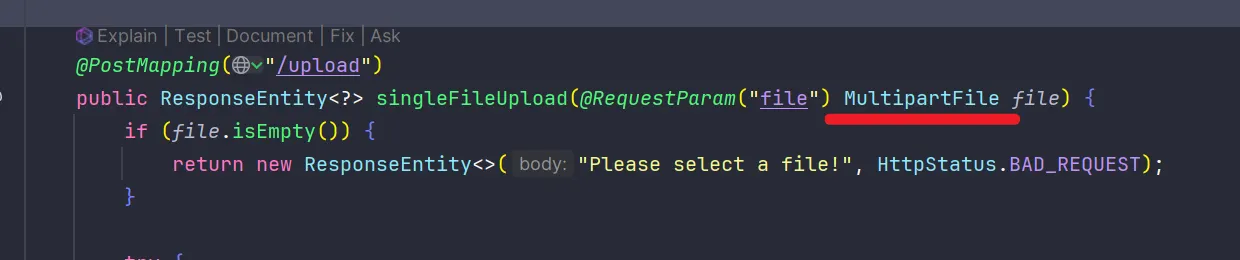

프론트에서 FormData객체를 생성해서 인코딩서버로 영상을 날려주면,
인코딩 서버에서는 해당 파일을 MultipartFile로 받게 된다.
upload 메소드 전체 로직 구성
1. saveFileToLocal로 파일 저장
2. encodeMultipleResolutions 로 파일 인코딩
3. encryptAndPackage 로 파일 암호화 패키징
4. uploadToS3 스토리지 서버로 업로드
5. deleteLocalFiles 서버 내 파일 삭제 → 인코딩 서버는 가볍게 유지
@PostMapping("/upload")
public ResponseEntity<?> singleFileUpload2(@RequestParam("file") MultipartFile file) {
if (file.isEmpty()) {
return new ResponseEntity<>("Please select a file!", HttpStatus.BAD_REQUEST);
}
try {
// 파일을 로컬에 저장
Path targetLocation = videoService.saveFileToLocal(file);
// 파일 이름 및 경로 설정
String fileName = targetLocation.getFileName().toString();
String baseFileName = fileName.substring(0, fileName.lastIndexOf('.'));
Path directoryPath = targetLocation.getParent();
// 인코딩
videoService.encodeMultipleResolutions(targetLocation.toString(), baseFileName, directoryPath);
// 암호화 및 패키징
videoService.encryptAndPackage(baseFileName, directoryPath);
// 인코딩된 파일들을 S3에 업로드
videoService.uploadToS3(directoryPath, baseFileName);
// 영상 저장경로를 반환 (S3에서도 [엔드포인트 + 경로]로 호출할 수 있게 반환해줘야 함)
Path mpdFilePath = directoryPath.resolve(baseFileName + ".mpd");
RespDTO respDTO = new RespDTO(mpdFilePath);
// 로컬 파일 및 디렉토리 삭제
videoService.deleteLocalFiles(directoryPath);
return ResponseEntity.ok(new ApiUtil<>(respDTO));
} catch (IOException e) {
return ResponseEntity.status(HttpStatus.INTERNAL_SERVER_ERROR).body("File processing failed: " + e.getMessage());
} catch (InterruptedException e) {
throw new RuntimeException(e);
}
}
Java
복사
파일저장 로직 - saveFileToLocal 메소드
일단 영상 파일을 MultiPartFile로 받으면 의도한 경로에 저장을 해야된다.
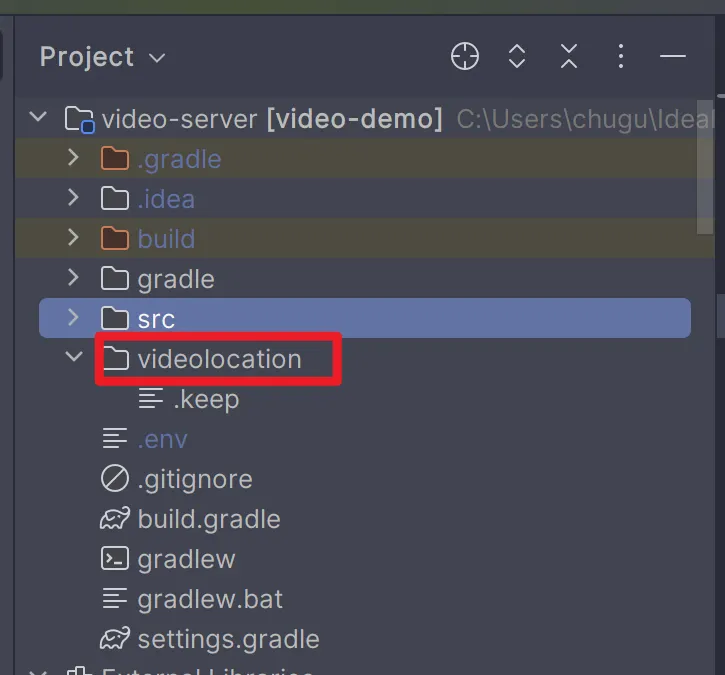

이 프로젝트에서는 videolocation이라는 경로에 저장되길 의도하고 있다.
그래서 videoService.saveFileToLocal 메소드로 해당 로직을 수행한다.
// 파일을 파싱해서, 경로 지정해서 저장
@Transactional
public Path saveFileToLocal(MultipartFile file) throws IOException {
// 파일이름을 확장자로부터 분리, 없다면 output 이름으로 지정
String originalFileName = file.getOriginalFilename();
String baseFileName = originalFileName != null ? originalFileName.substring(0, originalFileName.lastIndexOf('.')) : "output";
// 파일명에 대문자나 스페이스가 있다면은 소문자와 언더바로 교체하고, 확장자를 분리한다.
String sanitizedBaseFileName = baseFileName.toLowerCase().replaceAll("\\s+", "_");
String fileExtension = originalFileName != null ? originalFileName.substring(originalFileName.lastIndexOf('.')) : ".mp4";
// 파일 명을 그대로 디렉토리 생성
Path videoLocation = Paths.get(UPLOAD_DIR).toAbsolutePath().normalize();
Path directoryPath = videoLocation.resolve(sanitizedBaseFileName);
// 디렉토리가 없다면 디렉토리 생성
if (!Files.exists(directoryPath)) {
Files.createDirectories(directoryPath);
}
// 파일을 서버에 저장
Path targetLocation = directoryPath.resolve(sanitizedBaseFileName + fileExtension);
Files.copy(file.getInputStream(), targetLocation, StandardCopyOption.REPLACE_EXISTING);
return targetLocation;
}
JavaScript
복사
인코딩 로직 - encodeMultipleResolution 메소드
암호화를 담당하는 Shaka Packager가 암호화 작업과 동시에 mpd파일과
세그먼트파일을 생성하므로,
encodeMultipleResolution에서는 3가지 품질의 화질만 mp4로생성한다.
@Transactional
public void encodeMultipleResolutions(String inputFilePath, String baseFileName, Path directoryPath) throws IOException, InterruptedException {
String[] resolutions = {"480p", "720p", "1080p"};
String[] bitrates = {"800k", "1500k", "3000k"};
String[] sizes = {"854x480", "1280x720", "1920x1080"};
for (int i = 0; i < resolutions.length; i++) {
String resolution = resolutions[i];
String bitrate = bitrates[i];
String size = sizes[i];
String outputFilePath = directoryPath.resolve(baseFileName + "_" + resolution + ".mp4").toString();
ProcessBuilder pb = new ProcessBuilder(
"ffmpeg",
"-i", inputFilePath, // 인코딩을 원본 파일 위치
"-map", "0:v", "-map", "0:a",
"-b:v", bitrate, "-s:v", size, // 네트워크 속도에 맞게 전송 화질을 변경하는 설정
"-c:v", "libx264",
"-c:a", "aac",
"-video_track_timescale", "90000",
"-reset_timestamps", "1",
"-y", outputFilePath // 생성파일 위치
);
// 프로세스를 실행할 디렉토리를 설정하는 부분 - 이 설정이 없으면 mpd파일과 세그먼트 파일이 중구난방으로 생성됨
pb.directory(directoryPath.toFile());
pb.redirectErrorStream(true);
Process process = pb.start();
// 정상 작동중인지 로그를 스레드로 찍어봄
new Thread(() -> {
try (BufferedReader reader = new BufferedReader(new InputStreamReader(process.getInputStream()))) {
String line;
while ((line = reader.readLine()) != null) {
System.out.println(line);
}
} catch (Exception e) {
e.printStackTrace();
}
}).start();
// 동기적으로 실행하기 위한 코드
int exitCode = process.waitFor();
if (exitCode != 0) {
throw new RuntimeException("FFmpeg command failed with exit code " + exitCode);
}
}
// 오디오만 추출해서 인코딩
String audioOutputFilePath = directoryPath.resolve(baseFileName + "_audio.mp4").toString();
ProcessBuilder audioPb = new ProcessBuilder(
"ffmpeg",
"-i", inputFilePath,
"-vn",
"-c:a", "aac",
"-ar", "44100",
"-reset_timestamps", "1",
"-y", audioOutputFilePath
);
audioPb.directory(directoryPath.toFile());
audioPb.redirectErrorStream(true);
Process audioProcess = audioPb.start();
new Thread(() -> {
try (BufferedReader reader = new BufferedReader(new InputStreamReader(audioProcess.getInputStream()))) {
String line;
while ((line = reader.readLine()) != null) {
System.out.println(line);
}
} catch (Exception e) {
e.printStackTrace();
}
}).start();
int audioExitCode = audioProcess.waitFor();
if (audioExitCode != 0) {
throw new RuntimeException("FFmpeg command failed with exit code " + audioExitCode);
}
}
JavaScript
복사

여기서 비디오 부분과 오디오 부분을 따로 인코딩하는 이유는,
보통 네트워크로 인해 화질이 떨어져도 오디오의 품질은 그대로 유지하기 위해서이다.
그래서 따로 인코딩해 놓으면 따로 세그먼트 파일이 생성되어,
mpd파일은 비디오와 오디오를 따로 로딩해서 해당목적을 달성한다.
암호화 패키징 로직 - encryptAndPackage 메소드
이 메소드를 작성하기 전에 Shaka Packager가 설치가 되어있어야 된다.
여러가지 방법이 있는데,
1. 프로젝트 내부에서 Shaka packager 깃을 클론해서 build 하는 방법
2. 컴퓨터에 따로 install하는 방법 (이건 배포할때는 적용이 안되겠죠)
3. Shaka Packager 바이너리 파일을 프로젝트 내부에 두고, 명령어 작성 때마다 바이너리파일을 호출해서 실행하는 방법
갠적으로 3번이 제일 간편하다고 생각이 들어서 3번으로 설명을 하겠다.
링크안에 설명참조
 Shaka Packager구성하기
Shaka Packager구성하기 // 암호화 메소드
@Transactional
public void encryptAndPackage(String baseFileName, Path directoryPath) throws IOException, InterruptedException {
String[] resolutions = {"480p", "720p", "1080p"};
// 패키징 명령어를 배열로 직접 구성하고 processBuilder로 실행시킨다.
List<String> command = new ArrayList<>();
command.add(shakaPackagerPath); // 여기에 패키지 바이너리 파일의 경로를 넣으면 된다.
for (String resolution : resolutions) {
String mp4InputFile = directoryPath.resolve(baseFileName + "_" + resolution + ".mp4").toString();
String videoInitSegmentPath = directoryPath.resolve(baseFileName + "_init_" + resolution + ".m4s").toString();
String videoSegmentPath = directoryPath.resolve(baseFileName + "_chunk_" + resolution + "_$Number%05d$.m4s").toString();
command.add("in=" + mp4InputFile + ",stream=video,init_segment=" + videoInitSegmentPath + ",segment_template=" + videoSegmentPath);
}
String audioInitSegmentPath = directoryPath.resolve(baseFileName + "_init_audio.m4s").toString();
String audioSegmentPath = directoryPath.resolve(baseFileName + "_chunk_audio_$Number%05d$.m4s").toString();
String audioInputFile = directoryPath.resolve(baseFileName + "_audio.mp4").toString();
command.add("in=" + audioInputFile + ",stream=audio,init_segment=" + audioInitSegmentPath + ",segment_template=" + audioSegmentPath );
String encryptedOutputMpd = directoryPath.resolve(baseFileName + ".mpd").toString();
// enable_raw_key_encryption 속성이 사용자가 직접 라이센스를 구성할 수 있게 한다.
command.add("--enable_raw_key_encryption");
command.add("--keys");
command.add("label=:key_id=" + keyId + ":key=" + contentKey); // 내가 지정한 키를 여기 넣는다.
command.add("--mpd_output");
command.add(encryptedOutputMpd);
command.add("--segment_duration");
command.add("4");
ProcessBuilder pb = new ProcessBuilder(command);
pb.directory(directoryPath.toFile());
pb.redirectErrorStream(true);
Process process = pb.start();
new Thread(() -> {
try (BufferedReader reader = new BufferedReader(new InputStreamReader(process.getInputStream()))) {
String line;
while ((line = reader.readLine()) != null) {
System.out.println(line);
}
} catch (Exception e) {
e.printStackTrace();
}
}).start();
int exitCode = process.waitFor();
if (exitCode != 0) {
throw new RuntimeException("shaka-packager command failed with exit code " + exitCode);
}
// 필요 없는 파일 삭제
for (String resolution : resolutions) {
Files.deleteIfExists(directoryPath.resolve(baseFileName + "_" + resolution + ".mp4"));
Files.deleteIfExists(directoryPath.resolve(baseFileName + ".mp4"));
}
Files.deleteIfExists(directoryPath.resolve(baseFileName + "_audio.mp4"));
}
JavaScript
복사
S3 업로드 로직 - uploadToS3 메소드
이 메소드를 설명하기 위해서는 S3서버 구성부터 시작해야되니 다음 장에서
자세히 설명하기로 하고 메소드 형태만 대충 봐놓자.
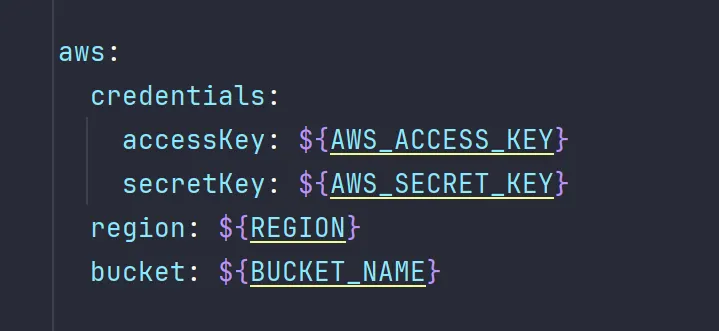
보면 S3서버를 구성하면 그 스토리지 저장소를 bucket이라고 부르게 되는데,
해당 서버에 업로드 요청을 하기위해 필요한 것은 아래와 같다.
•
s3 의존성 추가
•
버킷이름
•
s3 사용자 키
// S3로 업로드 하는 로직
public void uploadToS3(Path directoryPath, String baseFileName) throws IOException {
try (Stream<Path> paths = Files.walk(directoryPath)) {
List<Path> filesToUpload = paths.filter(Files::isRegularFile).collect(Collectors.toList());
for (Path fileToUpload : filesToUpload) {
String s3Key = "videolocation/" + baseFileName + "/" + fileToUpload.getFileName().toString();
s3.putObject(
PutObjectRequest.builder()
.bucket(awsProperties.getBucket())
.key(s3Key)
.build(),
software.amazon.awssdk.core.sync.RequestBody.fromFile(fileToUpload)
);
}
}
}
JavaScript
복사

이 메소드 내에서는 위의 요구목록이 보이지는 않지만,
S3의 라이브러리가 필요한 요구목록을 yml설정의 환경변수로 이미 가져가고 있기 때문이다.