
 프로젝트 내부에서 S3랑 통신을 할려면?


키를 담을 객체를 만들고 ⇒ AwsProperties
경로 데이터를 들고있는 객체를 만들고 ⇒ putObjectRequest
AWS 라이브러리의 C3Client객체를 이용하여 두 객체를 담아서
요청하면된다.
AwsProperties 생성


_core >> 내부 폴더에
AwsProperties 클래스를 생성한다.
변수 사용 정리


요런 느낌으로 변수를 끌어와서 사용할 것이다.
code는 yml변수를 @Value 로 끌어오고
yml은 env 변수를 ${변수}로 끌어오고
env에 내가 원하는 변수를 등록한다.


이렇게 env에 환경변수를 등록한다


yml에서 env변수를 끌어오려면
이렇게 import를 해야한다.
spring:
# .env import
config:
import: optional:file:.env[.properties]
JavaScript
복사

요렇게 먼저 세팅하면 사용할 수 있다.


그리고 깃에는 민감한 정보를 푸시할 수 없게 정책을 만들어 놓았다.
그래서 env같이 시크릿키가 담긴 파일을 깃 푸시를 할려면
해당 파일을 제외해야 되는데, 그러기 위해서는
.gitginore에 .env를 등록하면 된다.
그럼 push 할때 .env가 제외가 된다.
AwsProperties 정의
package com.project.videodemo._core;
import lombok.Data;
import lombok.Getter;
import lombok.Setter;
import org.springframework.boot.context.properties.ConfigurationProperties;
import org.springframework.context.annotation.Configuration;
@Data
@Configuration
@ConfigurationProperties(prefix = "aws")
public class AwsProperties {
private Credentials credentials;
private String region;
private String bucket;
@Data
public static class Credentials {
private String accessKey;
private String secretKey;
}
}
JavaScript
복사

아까 명시했던
액세스 키 / 시크릿 키 / 버킷 이름 / 리전 이름
을 담을 객체라고 보면 된다.

여기서 특이한 것은 @ConfigurationProperties(prefix = “aws”) 인데
이 설정으로 yml내부의 변수를 호출 할 수 있다.
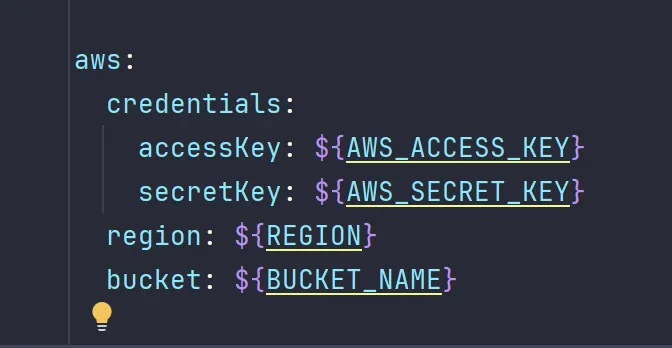

prefix = “aws” 의 의미는
yml 내부 aws 항목 내부를 의미하고
JSON데이터의 형태처럼 정의를 해주면 바인딩이 된다.


요런 느낌으로
이렇게 yml의 값이 코드로 바인딩이 되었지만,
그전에 yml이 변수로 ${} 문법으로 끌어오고 있는 것이 보이는데
이것은 .env를 이용해서 환경변수를 yml로 끌어 온 것인다.
AwsConfig 생성
package com.project.videodemo._core;
import org.springframework.context.annotation.Bean;
import org.springframework.context.annotation.Configuration;
import software.amazon.awssdk.auth.credentials.AwsBasicCredentials;
import software.amazon.awssdk.auth.credentials.StaticCredentialsProvider;
import software.amazon.awssdk.regions.Region;
import software.amazon.awssdk.services.s3.S3Client;
@Configuration
public class AwsConfig {
@Bean
public S3Client s3Client(AwsProperties awsProperties) {
AwsBasicCredentials awsCreds = AwsBasicCredentials.create(
awsProperties.getCredentials().getAccessKey(),
awsProperties.getCredentials().getSecretKey()
);
return S3Client.builder()
.region(Region.of(awsProperties.getRegion()))
.credentialsProvider(StaticCredentialsProvider.create(awsCreds))
.build();
}
}
JavaScript
복사

AWS config 전체 코드
_core 폴더 내부에 생성한다.
AwsBaisCredentials ( 라이브러리 객체)


내가 정의한 AwsProperties 객체의
액세스키와 시크릿키를
자바 라이브러리 객체인 AwsBasicCredentials에 할당한다.
S3Client


S3Client를 생성할 때
리전 정보랑 AwsBasicCredentials를 사용하여 credentialProvide에 할당한다.
s3 업로드 핵심로직


videoService에 의존성 주입으로
S3Client와 AwsProperties를 주입한다.
uploadToS3 로직
// S3로 업로드 하는 로직
public void uploadToS3(Path directoryPath, String baseFileName) throws IOException {
try (Stream<Path> paths = Files.walk(directoryPath)) {
List<Path> filesToUpload = paths.filter(Files::isRegularFile).collect(Collectors.toList());
for (Path fileToUpload : filesToUpload) {
String s3Key = "videolocation/" + baseFileName + "/" + fileToUpload.getFileName().toString();
s3.putObject(
PutObjectRequest.builder()
.bucket(awsProperties.getBucket())
.key(s3Key)
.build(),
software.amazon.awssdk.core.sync.RequestBody.fromFile(fileToUpload)
);
}
}
}
JavaScript
복사

videoService.uploadToS3의 로직인데
결국 S3Client s3 의 객체에 putObjectRequest로
경로와 요청데이터를 담아서 보내면 된다.
파일 삭제
// 업로드후 파일삭제
@Transactional
public void deleteLocalFiles(Path directoryPath) {
try (Stream<Path> paths = Files.walk(directoryPath)) {
paths.sorted(Comparator.reverseOrder())
.map(Path::toFile)
.forEach(File::delete);
} catch (IOException e) {
// 로깅 또는 에러 처리 로직 추가 가능
System.err.println("Failed to delete files: " + e.getMessage());
}
}
JavaScript
복사

업로드가 마무리 되었으면 인코딩 서버 내에서는 해당 파일을 삭제하여서
서버를 가볍게 유지한다.